1. DRC eDIRECT - https://www.drcedirect.com/all/eca-portal-v2-ui/#/login/TABE
2. CIS-3G - http://cdss.jobcorps.org/

Compliance Report
Follow this instruction to generate a compliance report and find out who needs to TABE test. (As of now, Mrs. Falstrom is the person you need to contact to get a list of students that is ready for TABE testing, but this could change in the future.)
Generate the STS Testing Ticket and Print It Out
Follow this instruction to learn how to generate the STS Testing Ticket and print them out for the student to sign, after they have completed the TABE test. Remember that this step is also important because the student needs to acknowledge that they have completed the test, otherwise the test will not count.
Schedule The Initial Student First
Make sure you schedule the initial students first because they are the priority students. After you have completed the initial students, you can move on to the rest. The initial students are the one that are still in CPP. The best way to find out who are the initial students is to ask all of the CPP instructors the students they are currently having in their class.
Things to remember
Make sure to upload the STS Testing Ticket to the student's E-Folder after the student has completed the test and signed their STS Testing Ticket. Remember, the student and the TABE instructor must both sign the student Testing Ticket before you can upload the STS Testing Ticket to the student's E-Folder. Click here to learn how to upload the STS Testing Ticket to each of the student's E-Folder.
Complete the Documentation of 60 Hours of Instruction at the end of the session for every student that took the TABE test.
No show student: If you scheduled a student for a test session and they did not show up for whatever reason, that student needs to be reschedule to TABE another day. Follow this guide to learn how to reschedule a student.
NOTE: Any student who do not have a good reason for not showing up will also receive a minor infraction. A minor infraction incident must be filed, printed out, signed by the TABE instructor and sent to the supervisor and PBSO (Standards). Follow this guide to learn how to record a minor infraction.
After you have understood EVERYTHING above, follow the guide below to learn how to schedule the student for TABE testing.
CIS-3G TABE Test Scheduling
1. Login to your Citrix Account
2. Click on Desktop tab at the top of the screen

3. Click on Job Corps > Open > Save the file to your Desktop


4. Click on the downloaded file at the bottom of your browser (if you are using Chrome)

5. Inside your Citrix Desktop, click on Start > Type in CIS-3G and click on your CIS-3G application

6. Log in to your CIS-3G

7. Click Menu > Testing > STS > Schedule STS Test

8. Select a test date by typing in the Test Schedule Date textbox

9. Select a time by clicking on the arrow next to the Test Schedule Loc/Time label
10. Click the down arrow next to the label that says TABE Test type and select the one you want.
NOTE: Initial are the students that are still in CPP and the Followup options are for the students that are out of CPP or has completed CPP.
The initial students are the priority one so make sure you schedule them to take the test first. Once the initial students are all done, you can begin by scheduling the followup student.
11. Select a student to TABE test. You can select up to 5 (by click on the check box to the left) and click on the Arrow button pointing to the right to add the student to the right side
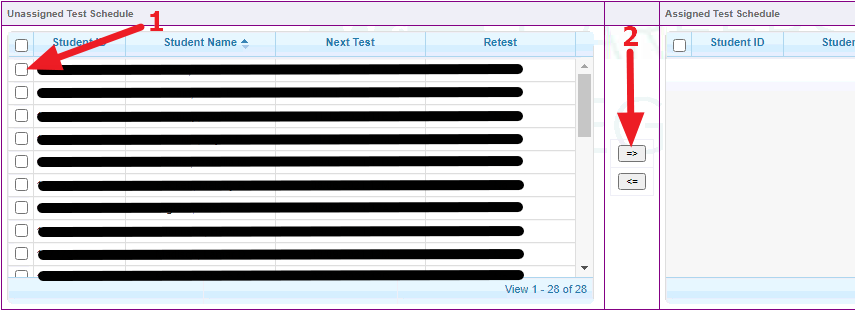
Testing Accommodation
When you added the student in step 11 above, make sure you pay attention to the column on the right that says Testing Accom. In the Testing Accom column, if there is a student that has a Y next to their name, you need to go into the Test Accommodations, look up the student using the search tool and check all of the boxes under Offered and Accepted and in the comment box type in Accepted, check the Confirm box and click Save. If you do not do this, the student test will be invalid. So it is very important that you complete this steps if there is a student that needs accommodation. Also note that accommodation must be accepted on the day the test are scheduled. Accommodation cannot be accepted before the scheduled test day. I would make a note so you can remember to accept all of the accommodation on the test day so you do not forget.
1. Go into the Test Accommodations in CIS-3G. Menu > Testing > STS > Test Accommodations

2. Search the student that needs accommodations

3. Check all of the offered and Accepted boxes. Make sure to type the word Accepted in the comments box to the right and at the bottom. If this is not done the test will be invalid. This also must be done on the day the student is scheduled to take the test, so it cannot be done any day before the test was scheduled.

DRC Insight
Once you are done scheduling the student in CIS-3G you must go to the website DRC Insight to complete the second half of the scheduling process before a student can take the TABE test. Follow the instruction below to learn how to complete the second half of the scheduling process.
1. Log in to your DRC Insight account. (You can get an account from the IT person or just borrow someone's account)
2. To to My APPLICATIONS > TEST MANAGEMENT > Test Management > Manage Test Sessions


3. Scroll down and click on Add Session

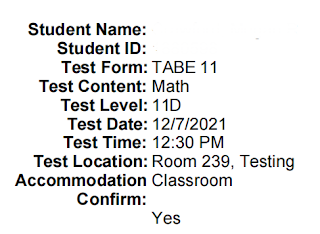
NOTE: Before you move on to step 4, open the STS Testing Ticket PDF file, you downloaded before you started the scheduling process to find out what type of test the student needs to take. On the report to the left it will tell you what test the student needs to take. (See example below). The Test Level will tell you which test the student needs to take including the difficulty. In the example below the test subject is Math with the test level 11D.
4. Follow the example below to assign a student to a test: (See Add Test Sessions picture below)
Session Name: J. Nguyen Follow-Up Math
Test: TABE 11
Content: Math
Level: TABE Math D
Begin Date: 12/7/2021
End Date: 12/8/2021 (always set this date to be 1 day after the begin date because the student is allowed up to 24 hours to complete the test, we just can't tell them that)
Student Last Name: Nguyen
Available Students: Select the available student
Save / Save / Add Another: For this you can select either option is fine. Select Save to save the session and click Save / Add Another to save the current session and add another session so you can continue adding more student to the list. You can schedule a maximum of five student per test session.
NOTE: Before you click Save or Save / Add Another, make sure the TABE test number, Content and Level correctly matches the one being displayed in the STS Testing Ticket, because if you select the wrong test, an incident report will be generated and sent back to you. If this happened the student will have to be rescheduled to take the TABE test again which will waste more time.

Print Students TABE Test username and password for assigned TABE test.
After you have completed the scheduling process, you have to print out the username and password for the student to log in to their TABE test session. The password changes from test to test but the username will stay the same. Follow the steps below to learn how to get the username and password for the test.
NOTE: I would just write down all of the student username and password on a piece of paper and hand it to the student to type it in so you can save time and paper but that is up to you. You can also just ask the student to join your Google meet and send them their username and password, instead of printing them out.
1. My APPLICATION > Test Management > Manage Test Sessions > Type in the date range FROM and Date Range TO and click on Show Sessions button. Your screen should look similar to the one below.

Action Icon and what they mean:
(From Left to Right)
Pencil Icon: To edit the student schedule. Use this if you need to correct any thing on the schedule such as starting date and ending date etc.
Floppy Disk Icon: To save the session to your local hard drive so you can import the session else where. This is never used if you are a test proctor assistant.
The Two Papers Icon: This allows you to make a copy of the session. This is helpful when trying to schedule a student for the same test on a different date.
The Calendar Icon: This is to view the student name, username, password, type of assessment, and the status.
The Printer Icon: To generate a PDF file that contains the student's username and password so you can print it out on hard copy.
The X Icon: To remove the student from the current test session.
Accommodations in DRC Insight
On you are done with scheduling the student in DRC Insight, you must accept the accommodations inside DRC on the day the student is scheduled for the test. Student accommodations are done in two places, one in the CIS-3G and one in the DRC Insight. If this is not done, the test will be invalid for the student that has accommodation and they will have to retest.
Follow the steps below to complete the accommodation in DRC Insight.
1. Log in to your DRC Insight account and click on STUDENT MANAGEMENT > Student Management

2. Click Manage Students

3. Search for the student that has accommodations and click the check box at the bottom.

4. Click on the square below the Action like it displayed below

5. Click Accommodations tab and check all of the accommodations under where it says TABE 11 & 12 then click on Save. Remember, this has to match the one on the STS Testing Ticket otherwise the test will be invalid. The screenshot below is an example of what the accommodations would look like on the STS Testing Ticket:


NOTE: BOTH TABE 11 & 12 and Locator 11 & 12 accommodations box must checked to avoid an invalid test. Another thing to remember, is that sometime you will see accommodations that are offered in CIS-3G but they are no longer available in DRC Insight, for this you will have to go back in to CIS-3G and uncheck the accommodation that are no longer available in DRC because both accommodation on the CIS-3G / STS Testing Ticket and DRC Insight has to match each other for the test to be valid.
Documentation Of 60 Hours of Instruction
Complete the form "Documentation of 60 Hours of Instruction" after the student has completed the TABE test. (This form must be filled out and complete every time the student completed a TABE test session.)

All areas indicated by the arrow and number must be filled out completely. (See below)
1. Student Full Name
2. Student ID
3. Today's date
4. Check the Subject the student is testing on
5. Type out the name of the Subject that the student met the 60 hours requirement
6. The Start date is always going to be the date the student completed the previous TABE test which can be located in CIS-3G under Student Information (See step 2 below)
7. The End date is always going to be the date the student recently completed the TABE test. (See step 2 below)
8. Check No
9. 60 hours
10. Student Full Name
1. To find the information to complete the form above, log into your CIS-3G account, click on Menu > Student Information > Search for the student > Click on TABE 11/12 tab

2. Click on the TABE 11/12 to locate the Start and End Date

3. Once you have completed the Documentation of 60 Hours of Instruction, save it and send it to your supervisor. As of this writing, it is Ms. Gardner and Ms. Dolleman
NOTE: The STS Test Ticket must be printed out and handed to Ms. Dolleman in the Record Office.
Case Note all TABE tests and make sure to include the student progress, subject, when is the next test date and so on in the RAP format. (See instruction and example below)
1. Login to CIS-3G > Menu > Case Notes > Case Notes

2. Click on the Magnifying glass

3. Type in the student First name and Last name and click Student Search

4. Click Select

5. Click Open Case Notes

6. Click New

7. Complete the Subject, Note Type, Phase and Comment and click on the Save button when you are done. You can use my example below to write your own Case Notes.


No comments:
Post a Comment